ऑनसेट HOBO MX1101 ब्लूटूथ आर्द्रता और तापमान डेटा
महत्वपूर्ण सूचना
शामिल आइटम:
- कमांड™ स्ट्रिप
- दोतरफा पट्टी
- हुक और लूप का पट्टा
- दो एएए 1.5 वी क्षारीय बैटरी
आवश्यक आइटम:
- HOBOमोबाइल ऐप
- iPhone, iPod touch, or iPad with iOS 7.1 or later and Bluetooth 4.0 or later
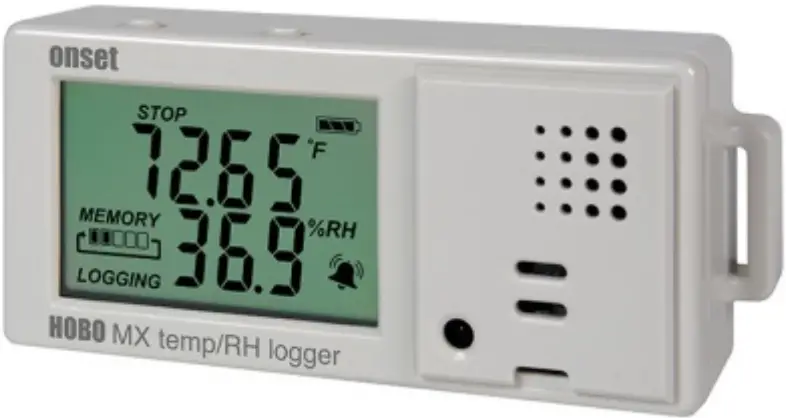
The HOBO MX Temp/RH data logger records and transmits temperature and relative humidity (RH) in indoor environments with its integrated sensors. This Bluetooth® Smart-enabled logger is designed for wireless communication with an iPhone®, iPod touch®, or iPad®. Using the HOBOmobile™ app for iOS, you can easily configure the logger, read it out, and view data on your mobile device, or export the data for further analysis. The logger can calculate minimum, maximum, average, and standard deviation statistics and be configured to trip audible or visual alarms at thresholds you specify. The logger also supports burst logging in which data is logged at a different interval when sensor readings are above or below certain limits. This compact data logger also has a built-in LCD screen to display the current temperature, relative humidity, logging status, battery use, memory consumption, and more.
विशेष विवरण
| तापमान संवेदक | |
| श्रेणी | -20° से 70°C (-4° से 158°F) |
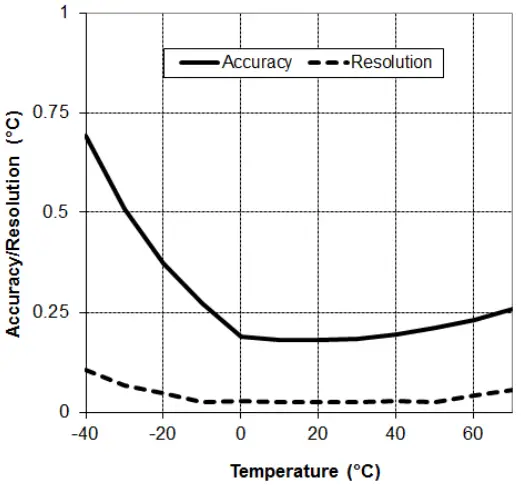
| शुद्धता | ± 0.21 डिग्री सेल्सियस 0 डिग्री से 50 डिग्री सेल्सियस (± 0.38 डिग्री फारेनहाइट 32 डिग्री से 122 डिग्री फारेनहाइट), प्लॉट ए देखें |
| संकल्प | 0.024 डिग्री सेल्सियस पर 25 डिग्री सेल्सियस (0.04 डिग्री फारेनहाइट 77 डिग्री फारेनहाइट), प्लॉट ए देखें |
| अभिप्राय | <0.1°C (0.18°F) प्रति वर्ष |
| आरएच सेंसर | |
| श्रेणी | 1% से 90% |
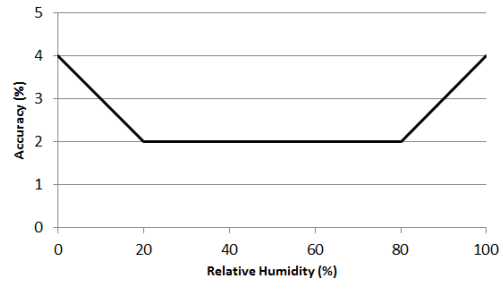
| शुद्धता | ±2% from 20% to 80% typical at 25°C (77°F), see Plot B |
| हिस्टैरिसीस | ±2% आरएच |
| संकल्प | 0.01°C (25°F) पर 77% |
| अभिप्राय | <1% प्रति वर्ष सामान्य |
| प्रतिक्रिया समय | |
| तापमान | 7:30 minutes in air moving 1 m/s (2.2 mph) |
| RH | 20 मीटर/सेकेंड (90 मील प्रति घंटे) की वायु प्रवाह में 1 सेकंड में 2.2% तक |
| लकड़हारा | |
| रेडियो पावर | 1 मेगावाट (0 डीबीएम) |
| ट्रांसमिशन रेंज | लगभग ३०.५ मीटर (१०० फीट) लाइन-ऑफ़-विज़न |
| वायरलेस डेटा मानक | Bluetooth Smart (Bluetooth Low Energy, Bluetooth 4.0) |
| लकड़हारा ऑपरेटिंग रेंज | -20° से 70°C (-4° से 158°F); 0 से 95% RH (गैर-संघनक) |
| लॉगिंग दर | 1 सेकंड से 18 घंटे |
| लॉगिंग मोड | निश्चित अंतराल (सामान्य, आंकड़े) या फट |
| मेमोरी मोड | फुल होने पर लपेटें या फुल होने पर रुकें |
| प्रारंभ मोड | तत्काल, पुश बटन, दिनांक और समय, या अगला अंतराल |
| स्टॉप मोड | जब मेमोरी फुल हो, पुश बटन, दिनांक और समय, या एक सेट लॉगिंग अवधि के बाद |
| पुनरारंभ मोड | दबाने वाला बटन |
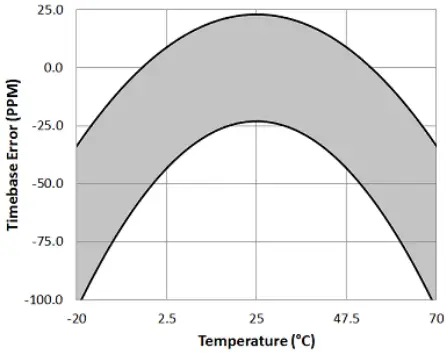
| समय सटीकता | ±1 minute per month at 25°C (77°F), see Plot C |
| बैटरी की आयु | 1 वर्ष, 1 मिनट के लॉगिंग अंतराल के साथ विशिष्ट। तेज़ लॉगिंग और/या आँकड़ेampling intervals, entering burst logging mode, and remaining connected with HOBOmobile will impact battery life. Excessive readouts, checking of Full Status Details, audible alarms, and paging all impact battery life. Visual alarms and other events can have a marginal impact on battery life. |
| बैटरी प्रकार | दो AAA 1.5 V क्षारीय बैटरियां, उपयोगकर्ता द्वारा बदली जा सकने वाली |
| याद | 128 केबी (84,650 माप, अधिकतम) |
| पूर्ण मेमोरी डाउनलोड समय | लगभग 60 सेकंड; डिवाइस लकड़हारे से जितना अधिक समय ले सकता है |
| एलसीडी | एलसीडी 0° से 50°C (32° से 122°F) तक दिखाई देता है; एलसीडी धीरे-धीरे प्रतिक्रिया कर सकता है या इस सीमा के बाहर के तापमान में खाली हो सकता है |
| आकार | 3.66 x 8.48 x 2.29 सेमी (1.44 x 3.34 x 0.9 इंच) |
| वज़न | 56 ग्राम (1.98 औंस) |
| पर्यावरण रेटिंग | आईपी50 |
 |
सीई मार्किंग इस उत्पाद को यूरोपीय संघ (ईयू) के सभी प्रासंगिक निर्देशों का अनुपालन करने वाला बताती है। |
| अंतिम पृष्ठ देखें | |
Plot A: तापमान सटीकता और संकल्प
Plot B: Typical RH Accuracy
Plot C: समय सटीकता
Logger Components And Operation
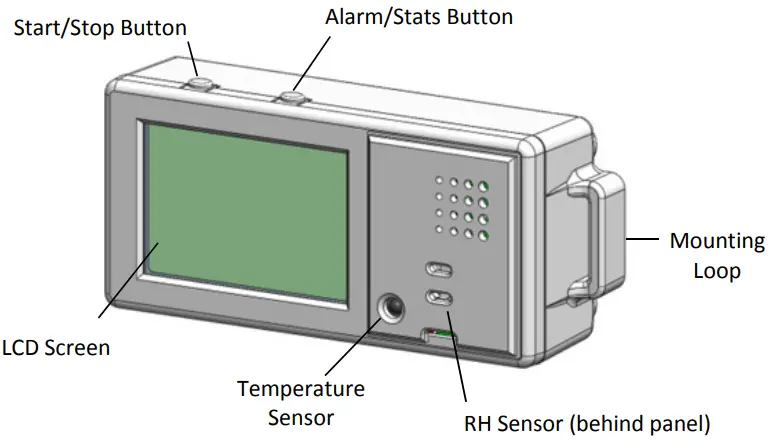
स्टार्ट/स्टॉप बटन: Press this button for 3 seconds to start or stop logging data, or to resume logging on the next even logging interval. This requires configuring the logger in HOBOmobile with a push button start or stop, and with Allow Button Restart selected (see Setting up the Logger). You can also press this button for 1 second to record an internal event (see Recording Internal Logger Events), to silence a beeping alarm (see Setting up Alarms), or to turn the LCD screen on if the option to turn off the LCD has been enabled (see Setting up the Logger).
लॉगर पासवर्ड रीसेट करने के लिए स्टार्ट/स्टॉप बटन और अलार्म/स्टेट्स बटन दोनों को 3 सेकंड के लिए एक साथ दबाएं।
अलार्म/आंकड़े बटन: Press this button for 1 second to switch between statistics, alarm readings, and the current sensor readings as applicable or to silence a beeping alarm. Press this button for 3 seconds to clear a visual alarm if the logger was configured in HOBOmobile to maintain the visual alarm until
the alarm button was pressed (see Setting up Alarms).
बढ़ते लूप्स: लकड़हारे को हुक-एंड-लूप स्ट्रैप के साथ माउंट करने के लिए दो माउंटिंग लूप (आरेख में केवल एक दिखाई देने वाला) का उपयोग करें (देखें लकड़हारा माउंट करना)।
तापमान संवेदक: This sensor is located in the lower left corner of the raised panel to the right of the LCD screen.
आरएच सेंसर: This sensor is located behind the vented panel in the logger case to the right of the LCD screen and the temperature sensor.
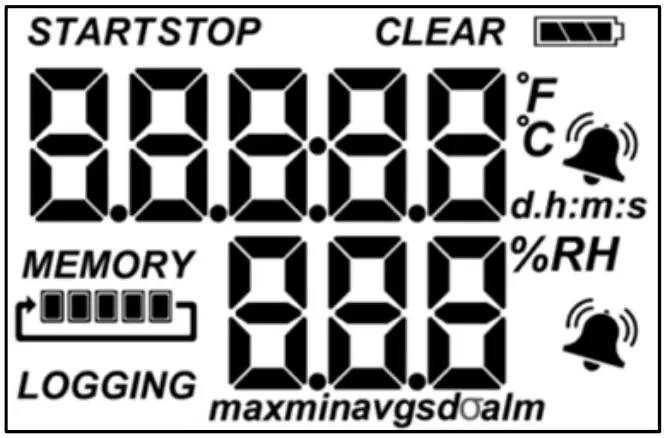
एलसीडी स्क्रीन: यह लकड़हारा एक एलसीडी स्क्रीन से लैस है जो वर्तमान स्थिति के बारे में विवरण प्रदर्शित करता है। यह पूर्वampयह पृष्ठ एलसीडी स्क्रीन पर प्रकाशित सभी प्रतीकों को दिखाता है, तथा उसके बाद अगले पृष्ठ पर दी गई तालिका में प्रत्येक प्रतीक की परिभाषा दी गई है।
| एलसीडी प्रतीक | विवरण |
| The logger is waiting to be started or restarted. Press and hold the Start/Stop button for 3 seconds to start the logger. |
|
| लॉगर को पुश बटन स्टॉप सक्षम करके प्रारंभ किया गया है; लॉगर को रोकने के लिए स्टार्ट/स्टॉप बटन को 3 सेकंड तक दबाकर रखें। | |
| बैटरी संकेतक शेष बैटरी की अनुमानित शक्ति को दर्शाता है। | |
 |
The logger has been configured to stop logging when memory fills. The memory bar indicates the approximate space remaining in the logger to record data. When first started, all five segments in the bar will be empty. In this exampले, लकड़हारा स्मृति लगभग भर चुकी है (स्मृति पट्टी में केवल एक खंड खाली है)। |
 |
The logger has been configured to never stop logging (wrapping). The logger will continue recording data indefinitely, with newest data overwriting the oldest data until the batteries die or the logger is reconfigured. When first launched, all five segments in the memory bar will be empty. इस पूर्व मेंampले, मेमोरी भर गई है (सभी पांच खंड भरे हुए हैं) और नया डेटा अब सबसे पुराने डेटा को अधिलेखित कर रहा है। यह तब तक जारी रहेगा जब तक लकड़हारा बंद नहीं हो जाता या बैटरी खत्म नहीं हो जाती। |
| लॉगर वर्तमान में लॉगिंग कर रहा है। | |
 |
A sensor reading is above or below the high or low alarm limit that you configured. Press and release the Alarm/Stats button until the “alm” symbol (described below) is displayed on the screen. This symbol at left will clear depending on how visual alarms were configured in HOBOmobile. If the visual alarm was set to clear when the logger is reconfigured, this symbol will remain on the LCD until the next time new configure settings are loaded onto the logger (see Setting up the Logger). Otherwise, it will clear when the sensor reading is back within the alarm limits or by pressing the Alarm/Stats button for 3 seconds. |
| A visual alarm is ready to be cleared. This will only appear if HOBOmobile was configured to maintain the visual alarm until the alarm button is pressed. Press the Alarm/Stats button for 3 seconds to clear the visual alarm. Note that an audible alarm can be silenced by pressing the Start/Stop button or Alarm/Stats button for 1 second. |
|
 |
These symbols show the maximum, minimum, average, and standard deviation values most recently calculated by the logger (if the logging mode has been set to Fixed Interval in HOBOmobile and each statistic has been selected; see Statistics Logging). Press the Alarm/Stats button for 1 second to cycle through the available statistics and then back to the current sensor reading (or to the alarm value if applicable). |
| यह सबसे दूर का आउट-ऑफ-रेंज एस हैampलॉगर परिनियोजन के दौरान प्रदर्शित फ़ाइल। अलार्म/आँकड़े बटन दबाएँ view यह रीडिंग। किसी भी सांख्यिकी (ऊपर परिभाषित) के माध्यम से चक्र करने के लिए अलार्म/आँकड़े बटन को फिर से दबाएँ और अंततः वर्तमान सेंसर रीडिंग पर वापस आएँ। | |
 |
यह एक पूर्व हैampतापमान रीडिंग का ले. Temperature units are determined by the settings in HOBOmobile. To switch between Celsius and Fahrenheit, change the units in the HOBOmobile Settings (the logger must be reconfigured for units changes to take effect). |
 |
यह एक पूर्व हैampएक आरएच रीडिंग का ले. |
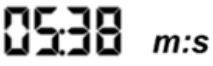 |
लॉगर को किसी खास तारीख/समय पर लॉगिंग शुरू करने के लिए कॉन्फ़िगर किया गया है। लॉगिंग शुरू होने तक डिस्प्ले दिन, घंटे, मिनट और सेकंड में उल्टी गिनती करेगा। इस उदाहरण मेंampलॉगिंग शुरू होने तक le, 5 मिनट और 38 सेकंड शेष हैं। |
| The configure settings are being loaded onto the logger from HOBOmobile. | |
 |
An error occurred while loading the configure settings onto the logger from HOBOmobile. Try reconfiguring the logger. |
 |
The logger has been stopped with HOBOmobile or because the memory is full. |
टिप्पणियाँ:
- लॉगिंग करते समय आप एलसीडी स्क्रीन को अक्षम कर सकते हैं। अगले भाग में बताए अनुसार लॉगर सेट करते समय "एलसीडी दिखाएं" का चयन रद्द करें। जब यह विकल्प अक्षम हो जाता है, तब भी आप अस्थायी रूप से ऐसा कर सकते हैं view 1 सेकंड के लिए स्टार्ट/स्टॉप बटन दबाकर एलसीडी स्क्रीन। इसके बाद LCD 10 मिनट तक ऑन रहेगा।
- The LCD screen refreshes every 15 seconds regardless of the logging interval selected in HOBOmobile. If you choose a logging interval less than 15 seconds, the data will be recorded at the faster interval, but the sensor readings will only be updated on the screen every 15 seconds.
- When the logger has stopped logging, the LCD screen will remain on with “STOP” displayed until the logger is offloaded to your mobile device (unless the logger was configured with the “Show LCD” option disabled). Once the logger has been offloaded, the LCD will turn off automatically after 2 hours. The LCD will turn back on the next time the logger connects with your device through HOBOmobile.
- The LCD screen flashes “HELLO” when you page the logger from HOBOmobile (see Downloading HOBOmobile and Connecting to a Logger).
- जब कोई श्रव्य अलार्म साफ़ हो जाता है तो एलसीडी स्क्रीन पर "चिरप ऑफ" चमकता है।
Downloading HOBOmobile And Connecting To A Logger
लॉगर से कनेक्ट होने और उसके साथ काम करने के लिए HOBOmobile ऐप इंस्टॉल करें।
- Download HOBOmobile. Go to the App Store and download HOBOmobile to your iPhone, iPod touch, or iPad.
- बैटरी स्थापित करें। Open the battery door on the back of the logger and insert two AAA batteries observing polarity (see Battery Information). Reinsert the battery door and snap it back into place.
- HOBOmobile खोलें. Enable Bluetooth in your device settings if prompted (go to Settings > Bluetooth and make sure it is marked as “On”).
- लकड़हारा से कनेक्ट करें. नल
 . The logger should appear in the Recently Seen/In Range list as shown here.

Tap the row in the list to connect to the logger. If it does not appear in the list, make sure the logger is within range of your mobile device. Note that current sensor readings are always visible in this list even if the logger is not logging.
Tips for connecting:
- सुनिश्चित करें कि लकड़हारा आपके मोबाइल डिवाइस की सीमा के भीतर है। सफल वायरलेस संचार की सीमा लगभग 30.5 मीटर (100 फीट) पूर्ण लाइन-ऑफ़-विज़न के साथ है।
- यदि आपका उपकरण रुक-रुक कर लकड़हारे से जुड़ सकता है या अपना कनेक्शन खो देता है, तो यदि संभव हो तो दृष्टि के भीतर लकड़हारे के करीब जाएं।
- If the logger appears in the Recently Seen/In Range list, but you cannot connect to it, close HOBOmobile and power cycle the mobile device. This forces the previous Bluetooth connection to close.
एक बार लॉगर से कनेक्ट होने के बाद आप निम्नलिखित में से एक कार्य का चयन कर सकते हैं:
- कॉन्फ़िगर करें. Select logger settings and load them onto the logger to start logging. See Setting up the Logger.
- Readout. Offload logger data. See Reading Out the Logger.
- Full Status Details. Check the battery level and view लॉगर के लिए वर्तमान में चयनित कॉन्फ़िगरेशन सेटिंग्स.
- Start Logging or Restart Logging. These options appear depending on the Start Logging and Stop Logging settings selected in the next section.
- लॉगिंग बंद करो. Stop the logger from recording data (this overrides any Stop Logging settings described in Setting up the Logger).
- पेज। Press and hold the Page icon and the logger will beep to help you locate a deployed logger (tap the Page icon if you only want the logger to beep once). “HELLO” also appears on the LCD when the logger is paged.
- Clear Audible Alarm. If audible alarms are enabled as described in Setting up Alarms, use this to clear a beeping alarm on the logger.
- Logger Password. Select this to create a password for the logger that will be required if another mobile device attempts to connect to it. To reset a password, simultaneously press both the Start/Stop button and the Alarm/Stats button on the top of the logger for 3 seconds or tap Reset to Factory Default in the Set Logger Password screen.
- प्रक्रिया यंत्र सामग्री का नवीनीकरण। When new logger firmware is available, this action appears in the list. Select it and follow the instructions on the screen. Note that if there is a communication failure during the firmware update process, the logger will revert to the previous firmware.
- Force Offload. This may appear if an error was encountered when loading configure settings. Select this to offload all the data on the logger before reconfiguring the logger.
Setting Up The Logger
Use HOBOmobile to set up the logger, including setting alarms, selecting the options to start and stop logging, and choosing a logging mode. These steps provide an overview of setting up the logger. For complete details, see the HOBOmobile User’s Guide.
- नल and select a logger in the Recently Seen/In Range list to connect to it.
- एक बार कनेक्ट होने पर कॉन्फिगर पर टैप करें।

- Tap Label and type a name for the logger up to 20 characters (optional). Tap Done.
- लॉगर को पसंदीदा समूह, किसी मौजूदा कस्टम समूह में जोड़ने के लिए समूह पर टैप करें, या 20 अक्षरों तक का नया समूह नाम बनाएँ (वैकल्पिक)। पूर्ण पर टैप करें।
- लॉगिंग शुरू करें पर टैप करें और चुनें कि लॉगिंग कब शुरू होगी:
- अब। कॉन्फिगर स्क्रीन में स्टार्ट पर टैप करने के तुरंत बाद लॉगिंग शुरू हो जाएगी।
- अगले लॉगिंग अंतराल पर। लॉगिंग अगले सम अंतराल पर शुरू होगी जैसा कि चयनित लॉगिंग अंतराल द्वारा निर्धारित किया गया है।
- बटन पुश पर। Logging will begin once you press the Start/Stop logging button on the logger for 3 seconds.
- दिनांक/समय पर। Logging will begin at a date and time you specify. Select the Date and time Tap Done.
- लॉगिंग बंद करें पर टैप करें और लॉगिंग समाप्त होने के समय के लिए विकल्पों का चयन करें।
a. दो मेमोरी विकल्पों में से एक चुनें:- जब स्मृति भर जाती है। लॉगर तब तक डेटा रिकॉर्ड करना जारी रखेगा जब तक मेमोरी भर न जाए।
- कभी नहीं (पूरा होने पर लपेटें)। लॉगर अनिश्चित काल तक डेटा रिकॉर्ड करना जारी रखेगा, नवीनतम डेटा सबसे पुराने को ओवरराइट करेगा। यदि लॉगिंग मोड बर्स्ट पर सेट है तो यह विकल्प उपलब्ध नहीं है (बर्स्ट लॉगिंग देखें)।
b. Select On Button Push if you want to be able to stop logging by pushing the Start/Stop button on the logger for 3 seconds. Note that if you also choose On Button Push for the Start Logging option, then you will not be able to stop logging until 30 seconds after logging begins.
If you select On Button Push for the Stop Logging option, then you also have the option to select Allow Button Restart. This allows you to stop and then resume logging during the deployment by pushing the Start/Stop button on the logger for 3 seconds.
महत्वपूर्ण: When Allow Button Restart is selected and you use the Start/Stop button to stop and restart logging, logging will restart on the next even logging interval, not at the time the button was pushed. For example, a logger started logging at 7:00 AM with a logging interval set to 1 hour. If you press the Start/Stop button to stop the logger at 8:45 AM and then press the button again at 10:15 AM, logging will not begin immediately at 10:15 AM. Instead, logging will begin again at 11:00 AM, which is the next even interval time based on your 1-hour logging interval.
Therefore, depending on the logging interval, the gap between the time you press the button to resume logging and the time actual logging begins could be significant. The faster the logging interval, the less time will elapse before logging resumes.
c. लॉगिंग को कब रोकना है, इसके लिए निम्न में से किसी एक समय विकल्प का चयन करें: - कभी नहीं। इसे चुनें यदि आप नहीं चाहते कि लकड़हारा किसी पूर्व निर्धारित समय सीमा पर रुके।
- दिनांक/समय पर। Select this if you want the logger to stop logging on a specific date and time. Select the date and time and then tap Done.
- बाद में। Select this if you want to control how long the logger should continue logging once it starts. Choose the amount of time you want the logger to log data and then tap Done. For exampयदि आप चाहते हैं कि लॉगर लॉगिंग शुरू होने के बाद 30 दिनों के लिए डेटा लॉग करे, तो 30 दिन का चयन करें।
d. संपन्न टैप करें.
- लॉग किए जाने वाले सेंसर माप प्रकारों का चयन करें।
By default, both the temperature and RH sensors are enabled. Both sensors are required to calculate dew point, which is an additional data series available for plotting after reading out the logger. You can also set up alarms to trip when a sensor reading rises above or falls below a specified value. See Setting up Alarms for details on enabling sensor alarms and selecting the associated audible and visual alarm settings. - Tap Logging Mode. Select either fixed interval logging or burst logging. With fixed interval logging, the logger records data for all enabled sensors and/or selected statistics at the logging interval selected (see Statistics Logging for details on choosing statistics options). In burst mode, logging occurs at a different interval when a specified condition is met. See Burst Logging for more information. Tap Done.
- Enable or disable Show LCD, which controls whether the LCD on the logger will remain illuminated while the logger is logging. If you disable Show LCD, the LCD on the logger will not show the current reading, status, or other information while the logger is logging. You will, however, be able to
temporarily turn the LCD screen on by pressing the Start/Stop button on the logger for 1 second. In addition, you can always view लॉगर की एलसीडी सेटिंग पर ध्यान दिए बिना आपके मोबाइल डिवाइस पर किसी भी इन-रेंज लॉगर की स्थिति (लागू होने पर लॉगर पासवर्ड की आवश्यकता हो सकती है)। - Tap Start in the upper right corner of the Configure screen to load the settings onto the logger if you are ready to start.

Logging will begin based on the settings you selected.
Deploy the logger using the mounting materials (see Mounting the Logger). After logging begins, you can read out the logger at any time (see Reading Out the Logger for details).
Setting Up Alarms
जब सेंसर रीडिंग एक निर्दिष्ट मान से ऊपर या नीचे गिरती है तो आप लॉगर पर ट्रिप करने के लिए अलार्म सेट कर सकते हैं। यह आपको समस्याओं के प्रति सचेत कर सकता है ताकि आप सुधारात्मक कार्रवाई कर सकें। अलार्म सेट करने के लिए:
- नल and select a logger in the Recently Seen/In Range list to connect to it.
- एक बार कनेक्ट होने पर कॉन्फिगर पर टैप करें।
- In Sensor & Alarm Setup, tap an enabled sensor.
- Enable the High Alarm if you want an alarm to trip when the sensor reading rises above the high alarm value. Drag the slider to the reading that will trip the alarm or tap the value field and type a specific reading. In this exampले, जब तापमान 85°F से ऊपर बढ़ जाएगा तो अलार्म बज उठेगा।
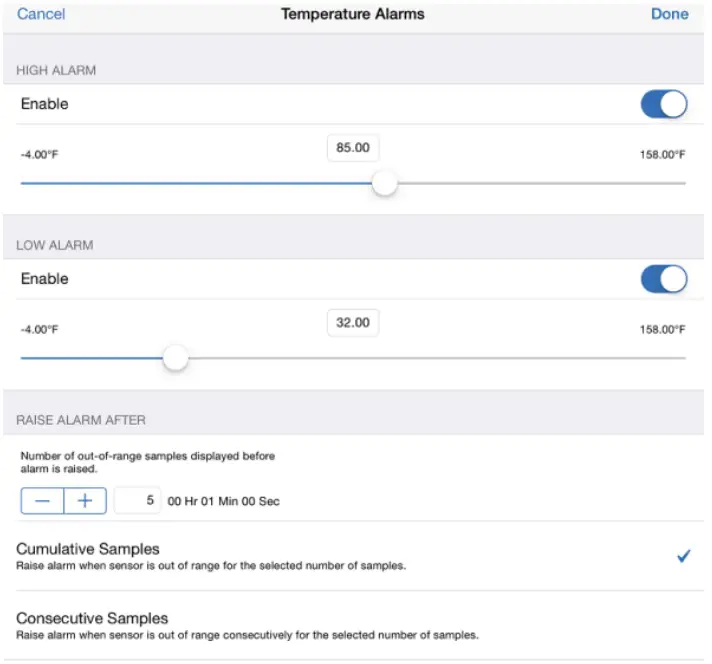
- यदि आप चाहते हैं कि सेंसर रीडिंग कम अलार्म मान से नीचे आने पर अलार्म ट्रिप हो जाए तो लो अलार्म सक्षम करें। स्लाइडर को उस रीडिंग पर खींचें जो अलार्म ट्रिप करेगी या वैल्यू फ़ील्ड पर टैप करें और एक विशिष्ट रीडिंग टाइप करें। उदाहरण मेंampले, जब तापमान 32°F से नीचे चला जाता है, तो अलार्म बजने के लिए कॉन्फ़िगर किया गया है।
टिप्पणी: उच्च और निम्न अलार्म सीमाओं के वास्तविक मान लॉगर द्वारा समर्थित निकटतम मान पर सेट किए जाते हैं। - Under Raise Alarm After, select how many out-of-range samples are needed to trigger the alarm. For example, if Raise Alarm After is set to 5 as shown above, then there needs to be 5 sensor readings above 85°F or below 32°F before the alarm will trip. The time displayed next to the sample number indicates how long it would take for the alarm to trip based on the number of samples you entered and the fixed 15-second LCD refresh interval.
- Select either Cumulative Sampलेस या लगातार एसampयदि आप संचयी एस का चयन करते हैंamples, then the alarm will trip after a specific number of samples are outside the limits at any point during logging. If you select Consecutive Samples, then the alarm will trip after a specific number of samples outside the limits are displayed in a row. For example, if there are 5 readings in a row above 85°F, then an alarm will trip. However, if Cumulative Samples was selected instead, then the 5 readings could have taken place at any time during the deployment for the alarm to trip.
- यदि वांछित हो तो संपन्न पर टैप करें और अन्य सेंसर के लिए चरण 3–8 को दोहराएं।
- Back in the Configure screen, enable Audible Alarms if you want a beep to sound on the logger every 30 seconds when the sensor alarm trips. The beeping will continue until the alarm is cleared from HOBOmobile, either button on the top of the logger is pressed, or 7 days have passed. Battery life will be slightly reduced when this setting is enabled. It is recommended that you only enable this feature if you have regular access to the logger so that you can easily turn off the beeping.
- Also in the Configure screen, select one of the following options to determine how long the alarm icon will remain illuminated on the logger LCD screen after an alarm trips:
- लॉगर पुन: कॉन्फ़िगर किया गया। The alarm icon will remain visible on the LCD until the next time the logger is reconfigured.
- सेंसर सीमा में. The alarm icon will remain visible on the LCD until the sensor reading returns to the normal range between any configured high and low alarm limits.
- Alarm Button Pressed. The alarm icon will remain visible until you press the Alarm/Stats button on the logger.
- Tap Start in the Configure screen to load the alarm settings onto the logger if you are ready to start.
टिप्पणियाँ:
- The alarm icon will be illuminated on the logger LCD when the alarm trips. You can also press the Alarms/Stats button on the logger to view the farthest out-of-range value during the deployment. Alarm limits are checked when the logger’s LCD screen refreshes every 15 seconds.
- उच्च और निम्न अलार्म सीमा के लिए वास्तविक मान लकड़हारा द्वारा समर्थित निकटतम मान पर सेट होते हैं। उदाहरण के लिएample, the closest value to 85°F that the logger can record is 84.990°F and the closest value to 32°F is 32.043°F. In addition, alarms can trip or clear when the sensor reading is within the logger specifications of 0.02°C resolution. This means the value that triggers the alarm may differ slightly than the value entered. For exampउदाहरण के लिए, यदि उच्च अलार्म को 75.999°F पर सेट किया जाता है, तो अलार्म तब ट्रिप हो सकता है जब सेंसर रीडिंग 75.994°F हो (जो कि 0.02°C रिजोल्यूशन के भीतर है)।
- जब आप लॉगर को पढ़ते हैं, तो अलार्म ईवेंट प्लॉट पर या डेटा में प्रदर्शित हो सकते हैं file. See Recording Internal Logger Events.
- Once cleared, an audible alarm will start beeping again if the sensor values go out of the normal range. Even if an audible alarm is cleared, a visual alarm may remain on the logger LCD and in HOBOmobile depending on the settings selected for maintaining visual alarms or because the alarm condition may still be in effect. In addition, an audible alarm will continue beeping when the sensor values have returned to the normal range until it is cleared as described in step 9.
- Although an audible alarm and a visual alarm can occur at the same time when a sensor alarm is tripped, they are cleared in different ways. The audible alarm can be cleared as described in step 9. Meanwhile, a visual alarm is cleared as determined by the setting selected for Maintain Visual Alarm Until in the Configure screen. This means you could clear a beeping audible alarm and the visual alarm will remain on the LCD and in HOBOmobile until the logger is reconfigured, the sensor is in limits, or the alarm button is pressed–whichever setting you selected.
- If the logger was configured to stop logging with a button push, any tripped alarms will be cleared automatically when logging is stopped and no Alarm Cleared event will be logged in the data file. This ensures that the logger will start checking for alarm conditions when logging resumes (if the logger was configured with Allow Button Restart selected).
फट लॉगिंग
urst logging is a logging mode that allows you to set up more frequent logging when a specified condition is met. For example, a logger is recording data at a 5-minute logging interval and burst logging is configured to log every 30 seconds when the temperature rises above 85°F (the high limit) or falls below 32°F (the low limit). This means the logger will record data every 5 minutes as long as the temperature remains between 85°F and 32°F. Once the temperature rises above 85°F, the logger will switch to the faster logging rate and record data every 30 seconds until the temperature falls back to 85°F.
उस समय, सामान्य लॉगिंग अंतराल पर हर 5 मिनट में लॉगिंग फिर से शुरू हो जाती है। इसी तरह, यदि तापमान 32°F से नीचे गिर जाता है, तो लकड़हारा फिर से बर्स्ट लॉगिंग मोड में चला जाएगा और हर 30 सेकंड में डेटा रिकॉर्ड करेगा। एक बार जब तापमान वापस 32°F तक बढ़ जाता है, तो लकड़हारा सामान्य मोड में वापस आ जाएगा, हर 5 मिनट में लॉगिंग करेगा।
टिप्पणी: बर्स्ट लॉगिंग मोड में सेंसर अलार्म, आंकड़े और स्टॉप लॉगिंग विकल्प "रैप व्हेन फुल" उपलब्ध नहीं हैं।
बर्स्ट लॉगिंग सेट अप करने के लिए:
- नल and select a logger in the Recently Seen/In Range list to connect to it.
- एक बार कनेक्ट होने पर कॉन्फिगर पर टैप करें।
- लॉगिंग मोड पर टैप करें और फिर बर्स्ट लॉगिंग पर टैप करें।
- बर्स्ट सेंसर सीमा के अंतर्गत किसी सेंसर पर टैप करें।
- यदि आप चाहते हैं कि जब सेंसर रीडिंग किसी विशिष्ट रीडिंग से ऊपर उठ जाए तो बर्स्ट लॉगिंग हो, तो हाई लिमिट सक्षम करें। स्लाइडर को उस रीडिंग पर खींचें जो बर्स्ट लॉगिंग को ट्रिगर करेगी या वैल्यू फ़ील्ड पर टैप करें और एक विशिष्ट रीडिंग टाइप करें। इस उदाहरण मेंample, the logger will switch to burst logging when the temperature rises above 85°F.

- यदि आप चाहते हैं कि जब सेंसर रीडिंग किसी खास रीडिंग से कम हो जाए तो बर्स्ट लॉगिंग हो, तो लो लिमिट को सक्षम करें। स्लाइडर को उस रीडिंग पर खींचें जो बर्स्ट लॉगिंग को ट्रिगर करेगी या वैल्यू फ़ील्ड पर टैप करें और एक खास रीडिंग टाइप करें। उदाहरण मेंample, the logger will switch to burst logging when the temperature falls below 32°F.
- यदि वांछित हो तो संपन्न पर टैप करें और अन्य सेंसर के लिए चरण 4–7 को दोहराएं।
- Tap Burst Logging Interval and select an interval faster than the logging interval. Keep in mind that the more frequent the burst logging rate, the greater the impact on battery life and the shorter the logging duration. Tap Done.
- लॉगिंग मोड स्क्रीन से बाहर निकलने के लिए संपन्न पर टैप करें।
- यदि आप शुरू करने के लिए तैयार हैं, तो लॉगर पर बर्स्ट सेटिंग्स लोड करने के लिए कॉन्फ़िगर स्क्रीन में प्रारंभ टैप करें।
टिप्पणियाँ:
- Once the logger is configured, the high and low burst limits are only checked when the logger’s LCD screen refreshes once every 15 seconds. Therefore, if you set the logging interval to less than 15 seconds and the sensor reading falls outside the levels, the burst logging will not begin until the next 15-second refresh cycle.
- यदि एक से अधिक सेंसर के लिए उच्च और/या निम्न सीमाएँ कॉन्फ़िगर की गई हैं, तो बर्स्ट लॉगिंग तब शुरू होगी जब कोई उच्च या निम्न स्थिति सीमा से बाहर हो जाएगी। बर्स्ट लॉगिंग तब तक समाप्त नहीं होगी जब तक कि सभी सेंसर पर सभी स्थितियाँ सामान्य सीमा के भीतर वापस नहीं आ जातीं।
- बर्स्ट लॉगिंग सीमाओं के लिए वास्तविक मान लॉगर द्वारा समर्थित निकटतम मान पर सेट किए जाते हैं। उदाहरण के लिएamp85°F का निकटतम मान जो लॉगर रिकॉर्ड कर सकता है वह 84.990°F है और 32°F का निकटतम मान 32.043°F है।
- Burst logging mode can begin or end when the sensor reading is within the logger specifications of 0.02°C resolution. This means the value that triggers burst logging may differ slightly than the value entered. For exampउदाहरण के लिए, यदि तापमान अलार्म के लिए उच्च सीमा 75.999°F पर सेट की जाती है, तो बर्स्ट लॉगिंग तब शुरू हो सकती है जब सेंसर रीडिंग 75.994°F हो (जो 0.02°C रिज़ॉल्यूशन के भीतर है)।
- एक बार उच्च या निम्न स्थिति साफ़ हो जाने पर, लॉगिंग अंतराल समय की गणना बर्स्ट लॉगिंग मोड में अंतिम रिकॉर्ड किए गए डेटा बिंदु का उपयोग करके की जाएगी, न कि "सामान्य मोड" में दर्ज अंतिम डेटा बिंदु। उदाहरण के लिएampले, मान लें कि लॉगर के पास 10 मिनट का लॉगिंग अंतराल है और 9:05 पर डेटा पॉइंट लॉग किया है। फिर, उच्च सीमा को पार कर गया और 9:06 पर बर्स्ट लॉगिंग शुरू हुई। बर्स्ट लॉगिंग तब 9:12 तक जारी रही जब सेंसर रीडिंग उच्च सीमा से नीचे गिर गई। अब वापस सामान्य मोड में, अगला लॉगिंग अंतराल अंतिम बर्स्ट लॉगिंग बिंदु से 10 मिनट या इस मामले में 9:22 होगा। यदि बर्स्ट लॉगिंग नहीं हुई होती, तो अगला डेटा बिंदु 9:15 पर होता।
- A New Interval event is created each time the logger enters or exits burst logging mode. See Recording Internal Logger Events for details on plotting and viewing the event. In addition, if the logger is stopped with a button push while in burst logging mode, then a New Interval event is automatically logged and the burst condition is cleared, even if the actual high or low condition has not cleared. The logger will check the high and low conditions when logging resumes (if the logger was configured with Allow Button Restart selected).
सांख्यिकी लॉगिंग
निश्चित अंतराल लॉगिंग के दौरान, लॉगर चयनित लॉगिंग अंतराल पर सक्षम सेंसर और/या चयनित आंकड़ों के लिए डेटा रिकॉर्ड करता है। सांख्यिकी की गणना इस प्रकार की जाती हैampआपके द्वारा निर्दिष्ट लिंग दर परिणामों के साथampप्रत्येक लॉगिंग अंतराल पर रिकॉर्ड की गई अवधि। प्रत्येक सेंसर के लिए निम्नलिखित आँकड़े लॉग किए जा सकते हैं:
- अधिकतम, या उच्चतम, sampled value,.
- न्यूनतम, या निम्नतम, sampled value,.
- सभी का औसतampled values, and.
- सभी s . के औसत से मानक विचलनampमूल्यों का नेतृत्व किया.
उदाहरणार्थample, a logger is configured with both the temperature and RH sensors enabled, and the logging interval set to 5 minutes. The logging mode is set to fixed interval logging with Normal and all four statistics enabled and with a statistics samp30 सेकंड का लिंग अंतराल। एक बार लॉगिंग शुरू होने के बाद, लॉगर वास्तविक तापमान और आरएच सेंसर मानों को हर 5 मिनट में मापेगा और रिकॉर्ड करेगा। इसके अलावा, लकड़हारा एक तापमान और RH s . लेगाampहर 30 सेकंड में ले और अस्थायी रूप से उन्हें मेमोरी में स्टोर करें। लकड़हारा तब s . का उपयोग करके अधिकतम, न्यूनतम, औसत और मानक विचलन की गणना करेगाampपिछले 5 मिनट की अवधि में एकत्रित हुए और परिणामी मानों को लॉग करें। लकड़हारे को पढ़ते समय, इसका परिणाम 10 डेटा श्रृंखला (किसी भी व्युत्पन्न श्रृंखला, जैसे ओस बिंदु सहित नहीं) में होगा: दो सेंसर श्रृंखला (तापमान और आरएच डेटा के साथ हर 5 मिनट में लॉग इन किया गया) प्लस आठ अधिकतम, न्यूनतम, औसत और मानक विचलन श्रृंखला (तापमान के लिए चार और आरएच के लिए चार मूल्यों के साथ गणना की जाती है और 5-सेकंड s . के आधार पर हर 30 मिनट में लॉग किया जाता हैampलिंग)।
आँकड़े लॉग करने के लिए:
- नल and select a logger in the Recently Seen/In Range list to connect to it.
- एक बार कनेक्ट होने पर कॉन्फिगर पर टैप करें।
- लॉगिंग मोड पर टैप करें और फिर निश्चित अंतराल लॉगिंग का चयन करें।
- स्क्रीन के शीर्ष पर दिखाए गए लॉगिंग अंतराल पर प्रत्येक सक्षम सेंसर के लिए वर्तमान रीडिंग रिकॉर्ड करने के लिए सामान्य का चयन करें। यदि आप केवल आँकड़े लॉग करना चाहते हैं तो इसे न चुनें।
- उन आंकड़ों का चयन करें जिन्हें आप चाहते हैं कि लकड़हारा प्रत्येक लॉगिंग अंतराल पर रिकॉर्ड करे: अधिकतम, न्यूनतम, औसत और मानक विचलन (मानक विचलन का चयन करते समय औसत स्वचालित रूप से सक्षम हो जाता है)। सभी सक्षम सेंसर के लिए आंकड़े लॉग किए जाएंगे। इसके अलावा, जितने अधिक आँकड़े आप रिकॉर्ड करते हैं, लकड़हारा की अवधि उतनी ही कम होती है और अधिक मेमोरी की आवश्यकता होती है।
- सांख्यिकी एस टैप करेंampलॉगिंग अंतराल और सांख्यिकी की गणना के लिए उपयोग की जाने वाली दर का चयन करें। दर लॉगिंग अंतराल से कम और उसका एक कारक होनी चाहिए। उदाहरण के लिएampयदि लॉगिंग अंतराल 1 मिनट है और आप सेकंड के लिए 5 सेकंड का चयन करते हैं, तो यह सही है।ampलिंग दर, तो लॉगर 12 सेकंड ले जाएगाampप्रत्येक लॉगिंग अंतराल (एक सेकंड) के बीच रीडिंगampएक मिनट के लिए हर 5 सेकंड में ले) और 12 एस का उपयोग करेंampप्रत्येक 1-मिनट के लॉगिंग अंतराल पर परिणामी आँकड़े रिकॉर्ड करने के लिए। ध्यान दें कि अधिक बार sampलिंग दर, बैटरी जीवन पर अधिक से अधिक प्रभाव।
- संपन्न टैप करें.
- लॉगिंग मोड स्क्रीन से बाहर निकलने के लिए पुनः संपन्न पर टैप करें।
- यदि आप शुरू करने के लिए तैयार हैं तो सांख्यिकी सेटिंग्स को लॉगर पर लोड करने के लिए कॉन्फ़िगर स्क्रीन में प्रारंभ टैप करें।
Once logging begins, click the Alarm/Stats button on the logger to cycle through the current maximum, minimum, average, and standard deviation data on the LCD screen. Note that the logger will always display the current sensor readings in HOBOmobile even if they are not being logged. You can plot the statistics series once you read out the logger.
Reading Out The Logger
लॉगर से डेटा ऑफ़लोड करने के लिए:
- नल .
- Find the logger you wish to offload in the Recently Seen/In Range list and tap that row.
- Once connected, tap Readout.
- नल
 को view a mini-graph of the offloaded data.
 - मिनी-ग्राफ़ पर टैप करें view ग्राफ़ का एक बड़ा संस्करण या साझा करने के लिए file.
See the HOBOmobile User’s Guide for details on viewing graphs and sharing data.
आंतरिक लकड़हारा घटनाओं की रिकॉर्डिंग
The logger records the following internal events to track logger operation and status. To plot events in HOBOmobile, tap a mini-graph and then tap ![]() . Select the events you wish to plot and then tap
. Select the events you wish to plot and then tap ![]() again. You can also view साझा या निर्यात किए गए डेटा में ईवेंट files.
again. You can also view साझा या निर्यात किए गए डेटा में ईवेंट files.
| आंतरिक घटना का नाम | परिभाषा |
| होस्ट कनेक्टेड | लकड़हारा मोबाइल डिवाइस से जुड़ा था। |
| शुरू कर दिया | लॉगिंग शुरू करने या फिर से शुरू करने के लिए स्टार्ट/स्टॉप बटन दबाया गया। |
| रोका गया | The logger received a command to stop recording data (from HOBO mobile or by pushing the Start/Stop button). |
| बटन ऊपर/बटन नीचे | स्टार्ट/स्टॉप बटन को 1 सेकंड के लिए दबाया गया। |
| चान <#> अलार्म ट्रिप हो गया | सेंसर अलार्म ट्रिप हो गया है; <#> सेंसर संख्या है, जहां 1 तापमान है और 2 RH है। |
| चान <#> अलार्म साफ़ किया गया | A sensor alarm has cleared; <#> is the sensor number, where 1 is temperature and 2 is RH. This event also contains the value that was furthest out of range for the sensor before the alarm cleared, which is only available in a shared or exported file. |
| नया अंतराल | लकड़हारा बर्स्ट लॉगिंग मोड में प्रवेश कर चुका है या बाहर निकल गया है। |
| सुरक्षित शटडाउन | बैटरी का स्तर 2.5 V से नीचे गिर गया; लकड़हारा एक सुरक्षित शटडाउन करता है। |
Mounting The Logger
शामिल सामग्री का उपयोग करके लकड़हारे को माउंट करने के कई तरीके हैं:
- लकड़हारा केस के पीछे चार चुम्बकों का उपयोग चुंबकीय सतह पर माउंट करने के लिए करें।
- लॉगर को दीवार या अन्य समतल सतह पर लगाने के लिए इसके पीछे कमांड स्ट्रिप्स लगाएँ। दो कमांड स्ट्रिप्स को इस तरह से डबल करें कि वे मैग्नेट से आगे निकल जाएँ।
- लकड़हारे को सतह पर चिपकाने के लिए दो तरफा टेप का उपयोग करें।
- लकड़हारे के दोनों किनारों पर बढ़ते लूप के माध्यम से हुक-एंड-लूप का पट्टा डालें ताकि इसे एक घुमावदार सतह, जैसे कि पाइप या ट्यूबिंग पर माउंट किया जा सके।
Protecting The Logger
लॉगर को इनडोर उपयोग के लिए डिज़ाइन किया गया है और अगर यह गीला हो जाता है तो जंग से स्थायी रूप से क्षतिग्रस्त हो सकता है। इसे संघनन से बचाएं। यदि एलसीडी स्क्रीन पर संदेश FAIL CLK दिखाई देता है, तो आंतरिक लॉगर घड़ी में संभवतः संघनन के कारण कोई खराबी थी। बैटरी को तुरंत निकालें और सर्किट बोर्ड को सुखाएं।
टिप्पणी: स्थैतिक बिजली के कारण लकड़हारा लॉगिंग बंद कर सकता है।
लॉगर का परीक्षण 8 केवी पर किया गया है, लेकिन लॉगर की सुरक्षा के लिए स्वयं को ग्राउंड करके इलेक्ट्रोस्टैटिक डिस्चार्ज से बचें। अधिक जानकारी के लिए, "स्टेटिक डिस्चार्ज" खोजें ऑनसेटकॉम्प.कॉम.
बैटरी जानकारी
लॉगर ऑपरेटिंग रेंज के चरम छोर पर ऑपरेशन के लिए लॉगर को दो उपयोगकर्ता-बदली एएए 1.5 वी क्षारीय या वैकल्पिक लिथियम बैटरी की आवश्यकता होती है। अपेक्षित बैटरी जीवन परिवेश के तापमान के आधार पर भिन्न होता है जहां लॉगर तैनात किया जाता है, लॉगिंग या एसampलॉगिंग अंतराल, ऑफलोडिंग की आवृत्ति और मोबाइल डिवाइस से कनेक्शन, सक्रिय चैनलों की संख्या, श्रव्य अलार्म अवधि, बर्स्ट मोड या सांख्यिकी लॉगिंग का उपयोग, और बैटरी प्रदर्शन। नई बैटरियां आम तौर पर 1 मिनट से अधिक लॉगिंग अंतराल के साथ 1 वर्ष तक चलती हैं। अत्यधिक ठंडे या गर्म तापमान में तैनाती, 1 मिनट से अधिक तेज़ लॉगिंग अंतराल, याamp15 सेकंड से अधिक तेज लिंग अंतराल बैटरी जीवन को प्रभावित कर सकता है। प्रारंभिक बैटरी स्थितियों और परिचालन वातावरण में अनिश्चितताओं के कारण अनुमानों की गारंटी नहीं है।
बैटरियां स्थापित करने या बदलने के लिए:
- लकड़हारे के पीछे बैटरी का दरवाजा खोलें।
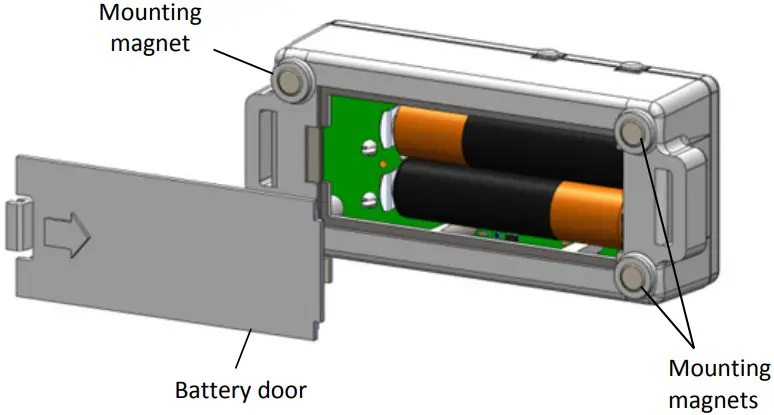
- किसी भी पुरानी बैटरी को हटा दें।
- ध्रुवता का अवलोकन करते हुए दो नई बैटरियां डालें।
- बैटरी के दरवाजे को फिर से लगाएं और इसे वापस जगह पर स्नैप करें।
![]() चेतावनी: लिथियम बैटरियों को काटें, जलाएँ, 85°C (185°F) से ज़्यादा गर्म न करें, या रिचार्ज न करें। अगर लॉगर को अत्यधिक गर्मी या ऐसी परिस्थितियों में रखा जाए जो बैटरी केस को नुकसान पहुँचा सकती हैं या नष्ट कर सकती हैं, तो बैटरियाँ फट सकती हैं। लॉगर या बैटरियों को आग में न फेंकें। बैटरियों की सामग्री को पानी के संपर्क में न आने दें। लिथियम बैटरियों के लिए स्थानीय नियमों के अनुसार बैटरियों का निपटान करें।
चेतावनी: लिथियम बैटरियों को काटें, जलाएँ, 85°C (185°F) से ज़्यादा गर्म न करें, या रिचार्ज न करें। अगर लॉगर को अत्यधिक गर्मी या ऐसी परिस्थितियों में रखा जाए जो बैटरी केस को नुकसान पहुँचा सकती हैं या नष्ट कर सकती हैं, तो बैटरियाँ फट सकती हैं। लॉगर या बैटरियों को आग में न फेंकें। बैटरियों की सामग्री को पानी के संपर्क में न आने दें। लिथियम बैटरियों के लिए स्थानीय नियमों के अनुसार बैटरियों का निपटान करें।
एफसीसी वक्तव्य
संघीय संचार आयोग का हस्तक्षेप वक्तव्य
इस उपकरण का परीक्षण किया गया है और पाया गया है कि यह FCC नियमों के भाग 15 के अनुसार, क्लास B डिजिटल डिवाइस के लिए निर्धारित सीमाओं का अनुपालन करता है। ये सीमाएँ आवासीय स्थापना में हानिकारक हस्तक्षेप के विरुद्ध उचित सुरक्षा प्रदान करने के लिए डिज़ाइन की गई हैं। यह उपकरण रेडियो आवृत्ति ऊर्जा उत्पन्न करता है और उसे विकीर्ण कर सकता है और यदि इसे निर्देशों के अनुसार स्थापित और उपयोग नहीं किया जाता है, तो यह रेडियो संचार में हानिकारक हस्तक्षेप पैदा कर सकता है। हालाँकि, इस बात की कोई गारंटी नहीं है कि किसी विशेष स्थापना में हस्तक्षेप नहीं होगा। यदि यह उपकरण रेडियो या टेलीविज़न रिसेप्शन में हानिकारक हस्तक्षेप पैदा करता है, जिसे उपकरण को बंद करके और चालू करके निर्धारित किया जा सकता है, तो उपयोगकर्ता को निम्नलिखित उपायों में से किसी एक द्वारा हस्तक्षेप को ठीक करने का प्रयास करने के लिए प्रोत्साहित किया जाता है:
- रिसीविंग एंटीना को रीओरिएंट या रीलोकेट करें
- उपकरण और रिसीवर के बीच के वियोग को और बढ़ाएं
- उपकरण को उस सर्किट के आउटलेट से कनेक्ट करें जो रिसीवर से अलग हो
- मदद के लिए डीलर या किसी अनुभवी रेडियो/टीवी तकनीशियन से परामर्श लें
यह डिवाइस FCC नियमों के भाग 15 का अनुपालन करता है। संचालन निम्नलिखित दो शर्तों के अधीन है:
- यह डिवाइस हानिकारक हस्तक्षेप उत्पन्न नहीं कर सकता है, तथा.
- इस डिवाइस को किसी भी प्रकार का हस्तक्षेप स्वीकार करना होगा, जिसमें अवांछित संचालन का कारण बनने वाला हस्तक्षेप भी शामिल है।
एफसीसी सावधानी: अनुपालन के लिए जिम्मेदार पक्ष द्वारा स्पष्ट रूप से अनुमोदित न किए गए किसी भी परिवर्तन या संशोधन से उपयोगकर्ता का इस उपकरण को संचालित करने का अधिकार रद्द हो सकता है।
उद्योग कनाडा वक्तव्य
यह डिवाइस इंडस्ट्री कनाडा लाइसेंस-मुक्त RSS मानक(ओं) का अनुपालन करता है। संचालन निम्नलिखित दो शर्तों के अधीन है:
- यह डिवाइस हस्तक्षेप उत्पन्न नहीं कर सकता, और
- इस डिवाइस को किसी भी हस्तक्षेप को स्वीकार करना होगा, जिसमें वह हस्तक्षेप भी शामिल है जो डिवाइस के अवांछित संचालन का कारण बन सकता है।
सामान्य जनसंख्या के लिए एफसीसी और इंडस्ट्री कनाडा आरएफ विकिरण जोखिम सीमाओं का अनुपालन करने के लिए, HOBO MX1101 लॉगर्स को सभी व्यक्तियों से कम से कम 20 सेमी की पृथक्करण दूरी प्रदान करने के लिए स्थापित किया जाना चाहिए और किसी अन्य एंटीना या ट्रांसमीटर के साथ सह-स्थित या संचालन नहीं किया जाना चाहिए।
ग्राहक सहेयता
1-800-लॉगर्स (564-4377)
508-759-9500
www.onsetcomp.com
loggerhelp@onsetcomp.com
© 2014 Onset Computer Corporation. All rights reserved. Onset, HOBO, and HOBOmobile are trademarks or registered trademarks of Onset Computer Corporation. iPhone, iPad, and iPod touch are registered trademarks of Apple Inc. Bluetooth and Bluetooth Smart are registered trademarks of Bluetooth SIG, Inc. All other trademarks are the property of their respective companies.
द्वारा वितरित MicroDAQ.com, लिमिटेड
www.MicroDAQ.com
603-746-5524

दस्तावेज़ / संसाधन
 |
onset HOBO MX1101 Bluetooth Humidity and Temperature Data Logger [पीडीएफ] निर्देश HOBO MX1101 Bluetooth Humidity and Temperature Data Logger, HOBO MX1101, Bluetooth Humidity and Temperature Data Logger, Temperature Data Logger, Data Logger |